I baked for an event a month or so back and I had been thinking about posting just about that process. As I would heartily recommend to you, when baking for an event I stick to what I know. So, there are no new recipes or experiments to share – just the process that I go through when baking in bulk for events.
I decided to bake for an event for my daughter’s preschool (even though she doesn’t officially start until September). The event was a country fair and the highlight would be the sheering of the two school sheep. (Yes, there is a school in the middle of San Francisco with two sheep…) This is the basic process I followed and have followed in the past.
Step 1: Find inspiration and come up with a high level plan
Whenever I am asked to or offer to bake for an event, I always look for at least one bit of of inspiration. If the event is for a person, I might ask their favorite color. Or if I know the person well, I will use whatever color I associate with them. I will look to something special about the event for inspiration. Is it themed for example. Flavor-wise I tend to just ask – are you a chocolate person? What’s your favorite fruit? Spice? Etc.Step 2: Write out all your recipes
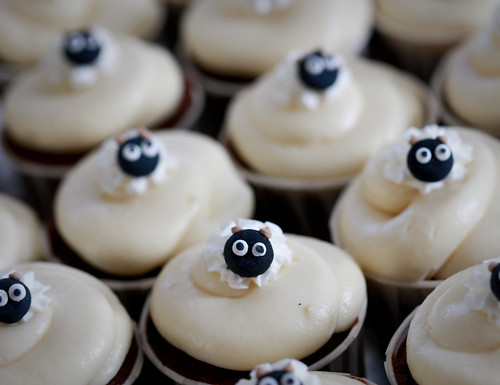
In this case, my starting point was sheep. So I did some googling and came across the PERFECT little sheep already done up for me in royal icing. I wanted to have both a chocolate and non-chocolate cupcake and something color-wise to contrast. I thought brown plus green would be a nice combo, so I quickly settled on vanilla cupcakes with green tea frosting and chocolate cupcakes with salted caramel frosting. The wonderful ebay shop owner, Lisa, hooked me up with a custom order and made up a bunch of sheep and birds shipped individually packaged and shipped all the way from the UK. The school also has chickens, but I settled for birds as I knew she could make them.
At a minimum you should print out all your recipes with the correct quantities. I also recommend writing them out as this ensures you read the recipe through and orients you to the steps involved, the equipment you will need, etc. I tend to write out my recipes like this and cross things out as I do them so I don’t forget. Most standard cupcake recipes make 24 or so cupcakes – at least on my blog. Sometimes I will halve them and make only 12. Usually for events you are baking a lot of cupcakes. This is where it gets tricky for the home baker. You really should make NO more then 30 to 36 at a time. Most mixers can’t accommodate more batter than that and you don’t want to over stuff the home oven. So do know that if you are making 100 cupcakes you likely have to make them in 3 batches. Professionals have quite an edge with their jumbo mixers and large, commercial convection ovens. Baking in bulk at home is a pain and I really try to avoid it. That said, I do occasionally give in…
When changing the quantities of a recipe start with the eggs. If there are 3 eggs in the recipe don’t halve the recipe for example. Either multiply everything by 1/3 or 2/3s. Regardless, get ready to do some fractions. Google can also help with this. Just be careful, check your math, and write everything down clearly.

Now that you have your recipes you need to write down your shopping list and come up with a plan of action. The shopping list is pretty easy. So I won’t cover that, although I do write out my shopping lists in the order in which I will come across the ingredients at the grocery store – but that’s me – and I am a bit anal about being “efficient”. The important thing is to plan what you will bake when. If you are an amateur baker such as myself, you likely have a demanding full-time job and/or have a family to take care of. So it’s likely you won’t have the large swath of free time it will take to get something like this done in one go.Step 4: Prepare all the recipes and store them for final assembly
I always start from the time of the event. I like to leave assembly for the day of the event and usually leave an hour or two for assembly and packing assuming I am making 100 or so cupcakes. If the event is at 11am on a weekend for example, plan on getting up early and focusing on assembly. If the event is in the afternoon, say 3 or so, you can plan on finishing up some recipes the morning off. Regardless, leave plenty of buffer for unexpected events. This will definitely help minimize stress.
This event was on Saturday at 11am, so I wouldn’t have the weekend to work and would just have the morning to assemble. I had to bake after work during the week (my least favorite time). I try to spread the work out as much as I can without having to resort to freezing anything. Buttercream and chocolate ganache frostings can store in the fridge well covered up to three days. Cupcakes also store in the fridge well covered up to three days, but I like to bake them as close to the event as I can. So, I tend to do the frostings first. One note: meringue frostings don’t store well. So forgo them when you are doing a large project.
I always try to fill and frost the day of the event if I can, the night before if its for very early in the morning or I am taking them to work. In this case I started on Wednesday with frostings, made a batch of cupcakes Thursday, and another on Friday. I assembled on Saturday morning. I purposefully didn’t make these filled cupcakes as that basically doubles the work involved. Making the fillings takes more time, but doing the actual filling can be very time-consuming. I have filled cupcakes when making about 120 or so once, but it was for a wedding and it was before I had a child and other demands on my time. In those days I could spend the entire weekend in the kitchen without a second thought. Those days are over… Take on what you can manage without causing undo stress.
A bit earlier I recommended baking in 30 to 36 cupcake batches in order to avoid disaster. I still recommend that. I rarely heed my own advice and made 2 batches with about 46 cupcakes in each batch. I have a larger sized mixer, but it was still a challenge. Don’t even attempt doubling a standard recipe if you don’t have a 6-quart mixer.
I managed the over-stuffing of the oven by starting off the baking at 375 with the convection fan on. You just have to be careful to lower the temp and/or turn off the convection at the right time. And the right time is pretty hard to determine. I usually turn the oven back down to 350 after a few minutes and turn off convection around 12 minutes. I find if the oven isn’t hot enough the cupcakes tend to overflow. But really, you should just bake in batches of 30 to 36 (which is about 1.5 times a normal recipe you see on my blog). The last thing you want after all that work and all those ingredients is a bunch of overflowed cupcakes. A couple is fine – that happens to me and those cupcakes tend to be the taste testers. On that note, always make more than you absolutely need. In this case, I was aiming for a number but had flexibility.
Like I mentioned, I absolutely recommend baking and storing for assembly as close to the event as possible. If you can do it all in one day, great. But for me and perhaps many of you, it’s not possible. With the frostings, I tend to just transfer the frosting into a bowl and wrap well with plastic wrap and store it in the fridge. With the cupcakes, I let them cool all the way off then put them back on a sheet pan and wrap that very well with plastic wrap. If you have enough tupperware to store all your cupcakes even better, but I don’t. If you must bake more then 3 to 4 days before the event you can freeze them (I wrap them in plastic wrap in small quantities that can fit in freezer bags) but there will be some dryness after thawing. So I recommend not doing it.

I won’t cover assembly much other then watch for cupcake toppers that will work for your event. For example, fresh fruit doesn’t hold up very well. It can dribble juice on your cupcake or start to look old. Candied fruit works as do sugar toppers. I tend to top my cupcakes with something simple that alludes to the flavor of the cupcake, but for some events – like a kids fair – I will do (or purchase) a more typical decoration.
I pack all my cupcakes in cupcake boxes with inserts that have individual holes for each cupcake. I bought the boxes in bulk (about 200 boxes) and it will be a while until I will run out. But many places sell paper or plastic cupcake containers in smaller quantities. I recommend going for a good box as it will help hold them in place and avoid delivery disaster. You will still need to watch for bumps in the road, but not have to worry about sliding. I also stick with disposable boxes for events given I have found it difficult to get my more permanent containers back promptly. Its totally up to you, just pack them carefully so they arrive safely.
Lastly, you may need to think about display. Thankfully there are many sites out there that have both disposable and non-disposable tiered cupcake holders. I also had a vintage, wood cupcake stand that I used for a few events. Usually its a challenge to get more then 30 or so cupcakes on these things, unless they are monstrous. I tend to put what I can on the tiered display and fill out the rest on the table around it. For this event I new I would have a hard time getting anything back given we hadn’t started at the school, so I settled for a something disposable.

Tidak ada komentar:
Posting Komentar